Showing posts with label cooking. Show all posts

Saturday, June 14, 2014

That avocado-quinoa thing

Last week in Austin I had the pleasure of dining at Lambert's BBQ with a couple of fellow Drupalists. We ordered a fleet of tasty dishes, but made particular note of an avocado/quinoa confabulation that lay beneath a trout: Cold Smoked Rainbow Trout, Avocado Quinoa, Bella Verde Cilantro, Tomato & Serrano Vinaigrette. The quinoa adhered to the little blocks of avocado and added subtle crunch to each bite, while also imparting significant flavor for two typically understated ingredients. Must've been _some_ vinaigrette. So, I decided to try to create something similar. And got a little distracted, so it's completely different, but not bad.

Avocado and Quinoa salad-thing

1 cup quinoa, any variety (the restaurant used plain, I used tricolor)
1 tbl olive oil, salt
~2 cups water

Toast the quinoa in the olive oil and salt until it begins to smell nutty. Add the water, bring to a boil, then simmer until the water is absorbed and the quinoa is the desired texture. Let cool.

1 small cucumber
1 small onion (red)

Meanwhile, dice cucumber and onion (I had a spring onion, but red would probably be better). Toss together in a bowl.

2 limes
2 avocados

Squeeze a couple of limes and reserve the juice (debatably, lemon might've been better). Dice two avocados (peel then slice) and toss with lime juice.

handful of cilantro
couple sprigs dill
salt and pepper

Chop herbs, add to cucumber and onion along with avocado and lime juice. Salt and pepper to taste and careful fold everything together with the quinoa. Let sit in the fridge for a bit for the flavors to relax, then serve at room temperature or chilled.

Suggestions welcome!

Wednesday, June 11, 2014

The Joy of "The Joy"


This article originally appeared in the Mountain Courier in March 2013, and I completely forgot to post it to my blog! My friend Suzanne, who edits and writes for the paper, suggested I write the article after seeing my collection of Joys in my kitchen pantry.

The sun slowly rises over a small sea of pop-up tents, my coffee and my breath adding to the quietly dissipating morning fog. A lone jogger pads by, the only traffic at this early hour. Piles of neatly stacked root vegetables, compulsively organized by a sleep-deprived farmer, wait patiently for the 10 am rush. My numbing fingers flick through the pages of a cookbook I’m perusing, looking for recipes to recommend with today’s cuts of grass-fed beef, pork, lamb and chicken that I’m here to peddle.

I was a vegetarian for the first 20 or so years of my life and have since been playing catch-up on how to cook things like pork belly and beef tongue. My customers and I, the adult novice, have found this particular cookbook quite handy for basic information and creative uses for a wide range of ingredients, both familiar and novel. The book is the Joy of Cooking, my ultimate guide on all things food.

Farm markets vary greatly across the region and the seasons, which translates into a certain amount of uncertainty as to what will be available at any given time. Seasonal produce is preferable for freshness, nutrition and the local economy, but sometimes one just doesn’t know what to do with a pile of kale and turnips, much less the wealth of parsnips or variety meats. It is here, in the unexpected and unexplored, that a good reference on cooking becomes invaluable.

It was not my intention to collect multiple editions of the Joy of Cooking. When my first copy came to me, I was more interested in it as a book—an antique livre to add to my library—than as a cookbook. A quick read-through, however, inspired me to assemble an unnecessarily complex cake using separate recipes for the batter, frosting, filling, and probably cake syrup as well, not to mention decoration. My notes on the subject are still tucked into the pages of this 1943 edition (1946 printing).

This first Joy was a gift from my mother, purchased in an antiquarian bookshop in Vermont on the advent of my first apartment, and thereby my first kitchen. Before this, my cooking skills had approximately encompassed rice, eggs, and—thanks to a summer in a friend’s well-appointed kitchen—homemade pizza and cinnamon rolls. As a vegetarian still working on my thesis, my most elaborate dish was stir-fried vegetables with tofu. The Joy was essential to me for basic instructions, factual lookups, information on the latest new ingredient from the food co-op and rules for baking. It was indeed the ideal first cookbook.

As things progressed I acquired two more editions: a brand new 75th anniversary revision bought as retail therapy, and my grandmother’s own 1952 edition complete with her notes and clippings. My three copies currently reside with a 1972 revision owned by a roommate; four Joys in total.

Irma Rombauer’s first edition came into being in 1931 as a collection of personal recipes from her “Victorian roots” to pass on to her children as they left the nest. It was also intended as a helpful guide to the newly minted housewife, alone and bewildered in her kitchen, written to be “so clear that a child can follow it.”

The early editions were a very personal affair for Irma and her daughter, Marion Rombauer Becker, who provided the first illustrations as well as helping her mother test recipes and organize the book. Irma’s wit and familiar tone lend themselves to a very friendly text in which the cook can feel as if she has a personal relationship with her cookbook and its writer. My 1943 Joy includes advice on war rationing, as well as bunches of recipes for aspics, gelatine salads, timbales and soufflés, all in the interest of disguising an array of leftovers. My recipe of choice, however, is for Crepes Suzette (essentially flaming French pancakes), which comes with an amusing anecdote about the dish’s origins with Chef Henri Charpentier and the Prince of Wales.

Both the 1943 and 1952 editions contain extensive advice on entertaining, how to execute full dinner service and from which direction the servants should serve the fish course. There is a handy chart on various fish and how to cook them, quite a lot on baking and confections, nutrition charts, wine charts, herb charts, leftovers charts and a glossary. Irma also took care to “give this book the impression of sobriety and stability it deserves [such that] the alcoholic cocktails have been relegated to the chapter on Beverages.” On the other hand, she also acknowledged that while smoking at the dinner table was très gauche (it destroys the palate), the hostess must provide cigarettes and an ash tray to make her guests as comfortable as possible.

My grandmother’s Joy, the 1952 revision, continues largely along the same track as the 1943 with general rules aimed at gaining an understanding and then a variety of applications. There are some exciting additions such as more pasta, which “takes a good deal of doctoring to make palatable,” a more organized list of household hints and with the new illustrator, Ginnie Hoffman, diagrams for everything. Irma and Marion can be seen slightly at odds in the introduction, where Irma insists that no cook will read anything but the recipe and information that he or she is looking for, while Marion believes that explaining how the book works is worth a page or two.

These earlier versions also include a fairly extensive section on game lumped in with poultry. Terrapin, of course, is now protected under the Endangered Species Act, and not many would consider squirrel a viable food source, never mind bear. While the inclusion of frog legs, aspics and the use of the singular “cooky” may give these editions a dated appearance, even the very earliest Joy in my collection emphasizes nutrition, taking note of Americans’ tendency toward overeating and not balancing caloric intake with nutritional needs.

As time and culture have progressed through the last 75 years, the target audience shifted away from the blushing bride and housewife toward an independent new cook. In the middle years, many sections bit the dust, including “Know Your Ingredients,” much of the entertaining instruction, and the gelatine concoctions. The 1970s were a time when horizons and palates were broadening, food was being shipped greater distances and people were eating tofu, of all things. Marion Rombauer Becker reorganized the book into sections on The Foods We Eat, Heat and Keep, which meant that absolutely everything was shuffled and, I found, rearranged in illogical order. The 1975 edition was the most popular Joy ever, so it must have made sense to most readers and cooks.

Which brings us to the 75th anniversary Joy, published in 2006, thanks to Ethan Becker, Marion’s son. As a Rombauer broodling and graduate of Le Cordon Bleu, Ethan brought respect for heritage and tradition while being open to change. The revision he put together organizes the recipes once again by their place in a meal, beginning with drinks, then hors d’oeuvres, vegetables, meats, desserts, and finishing with methods for preserving. The glory of this edition is the encyclopedic appendix that brings back “Know Your Ingredients,” a plethora of substitution, conversion and other charts, and information on every method you might need to know. Contrary to my assumption, this edition actually contains an expanded section on game, although the handy diagram on squirrel is omitted.

So here we are, back from market with an armload of food, ready to experiment, to learn a new way of preparing a favorite squash and what exactly to do with a bundle of fiddleheads. Any bride, bachelor, or impulse shopper will find his or her way with Joy, branching out into ethnic cuisines, more modern dishes and favorite personal recipes from Ethan, Marion and Irma herself.

Epilogue: I have since also acquired a mint condition, dust jacket-intact 1964 edition of Joy. It is happily nested with the others and gets regular attention from the chef.

The original version of this article in the print edition is here as a PDF. It includes tidibits from other contributors in a four page layout extravaganza.

Tuesday, November 15, 2011

Photos of phood (now with vastly improved imaging capabilities)

tortellini, fresh, pasta, homemade, butternut, squash, stuffed, local

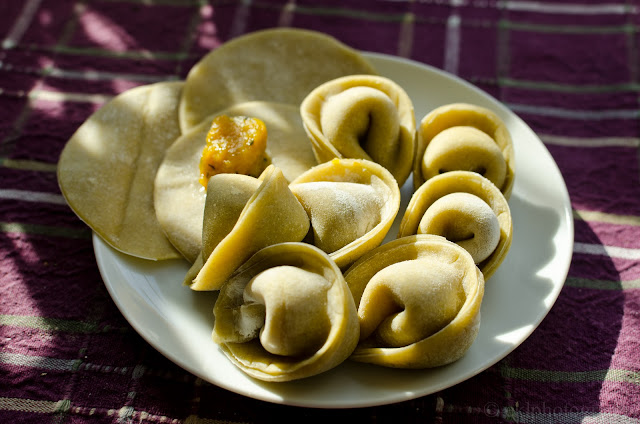
Apparently Mondays are good for making something different. The last time I did tortellini was at least a year ago, but this week I had nabbed a butternut squash at market and have enough eggs to burn on pasta. The squash wasn't terribly flavorful, so wrapping it in pasta seemed like a good plan. The photo shows some unrolled pasta circles, a bit of filling (squash + whatever herbs were lying around) and a few of the finished tortellinis. Cheese is really fantastic in these, but squash is a heckuva lot cheaper. They come out pretty big because I can only roll the pasta so thin with a rolling pin, and any less filling isn't sufficient.

I wont write out the entire process, but the pasta recipe is basically: for each egg, use a bit less than 100g of flour. I used 5 eggs and maybe 450g flour to start, a bit more for rolling, which makes for a very soft pasta dough, but is so much easier to work with.

The method: make a pile of flour with a well, put eggs in the middle, slowly stir flour in from edges until everything is integrated enough to knead (and not run off the counter). Knead. Let rest, covered. Divide, roll out to 1/4" thick slabs. Rest covered. Roll out as thin as you like, dry on a rack to slightly leathery feel. Cut. Dry some more if just doing noodles or stuff with stuff and let dry a bit. Freeze if not using right away, drop (fresh or frozen) in boiling water for ~5 min (mine, as I said, are very thick). Tada.

chocolates, sugar cube, designer, painted, truffles, Alexandria, VAchocolates, sugar cube, designer, painted, Alexandria, VA
chocolates, sugar cube, designer, painted, Alexandria, VA

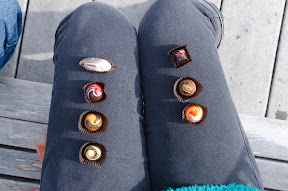
And because I had these photos of pretty chocolates from the Sugar Cube in Oldtown lying around, here are some pretty chocolates. They also tasted good, of course, very smooth, nice Autumn flavors.

Monday, May 31, 2010

These Are My Confessions

Well, really just the one: I kind of, maybe, just a little, but only in some respects, like Martha Stewart. Not like-like, and not like, want-to-be-"BFFs" -like, but one really has to admire the woman. If spending time in jail doesn't cause your massive domestic empire to fold up and hide in a corner, and you pretty much built all that yourself, well.. would that I may someday be so successful (sans the imprisonment thing).

I've been hunting for the book that started it all (according to Amazon, anyway): Entertaining, the 1982 guide to all things party, from hiring help to setting the table and making a bazillion dishes for the guests. For some reason none of the used bookstores I've scoured (a significant number, both in Brattleboro, Vermont and Washington, DC. The links are to my favourites) have it in stock. I think everyone else wants to hang on to it as well. For one thing, it's an emblem of a bygone era, the 1980s. In hindsight (and I'll grant you, I wasn't alive for most of that decade) everything was bright and hopeful, exuberant and jubilant and full of optimism. Nostalgia aside, the book brings that back to us, and gives denizens of this decade and century an opportunity to modify and modernize some very classy parties to fit our own characterless era.

I did find my own copy of Hors d'Oeuvres, which is equally sumptuous and dreamy. I think juxtaposing that style of opulence in decor and food presentation with a contemporary minimalism could be very gratifying. The best part of this book is not that Martha presents themed party menus or very tasty and precise recipes, but that everything is a bit mix and match. Because my guests are so often vegetarian or vegan, I need to be on my toes with modifications. Miniature tarts and sandwiches, small bites of fruit and cheese, roasted tortellini (the pictures in Hors d'Oeuvres inspired me to make my first tortellini from scratch) are all conveniently alterable. There's usually two parts to a recipe: the filling and the base. If, for example, I really like the salmon mousse tartlets, but can't serve salmon, I can replace it with herb mayonnaise and cucumbers, a sprig of dill on top. The first menu even begins with highly interchangeable tea sandwiches (p. 19).

This is also the book that led me to discover how few people in the States know what a pain de mie pan is. I even made a bet with a friend that Sur La Table wouldn't have one, or know what it was. Someone still owes me a cookie.

All of this is actually leading up to the fact that I made a recipe from Martha Stewart Living (May 2009) for dinner last night and it was very tasty. It did, however, fulfill my butter limit for the week, so I guess I'll be having dry toast for a while. The recipe was Brioche French Toast with Roasted Asparagus and Orange Beurre Blanc (image and recipe from MarthaStewart.com). As usual, I had about half the required ingredients, but I think it came out just as well anyway. I substituted smaller amounts of vermouth, soymilk, blood orange juice and onions for dry white wine, heavy cream (which I also left out of the beurre blanc altogether), more orange juice and shallots. And I made the brioche from scratch that morning, from a recipe in my new Beard's Bread Book for brioche loaf (not to be confused with little brioche buns). Very tasty bread, and it adds to the egginess of the dish without oversoaking the slices. Plus it smelled great in the pan as it was cooking. And I like asparagus.

Saturday, May 22, 2010

Photos of phood

This morning started out with slightly frenetic whipping of eggs, cream and mascarpone, followed by some folding and chilling, all of which led to this evening, when I laid out the strawberries and added lemon glaze... I'm pretty pleased with the results, but I'm very nervous that the nut crust will do its usual thing and refuse to dislodge itself from the confines of the pie plate. ah well. It will still be very, very tasty. Unfortunately I wont know until we get to the brunch party tomorrow. Impatience.

And wouldn't it be nice if I could include a digital taste in posts about food? Like scratch and sniff.

And then dinner tonight (after a batch of banana bread to take over to friends) is about to be fresh pasta with spinach, tofu, and green garlic pesto. Fresh pasta is wonderful, but it's very difficult to roll out by hand. The dough is quite stiff, and pressing down firmly enough with a rolling pin to get the sheet thin enough to make reasonable sized pasta is enough to make my carpal tunnel twinge.
And while I was out earlier I bought (extravagantly) a very clean, plastic covered jacketed copy of James Beard's bread book from Capitol Hill Books (staffed by an appropriately grumpy old guy and piled to the ceiling, literally, with books. Including the bathroom.). I'm pretty excited about it.

Saturday, May 15, 2010

Tuesday Night Dinner, part III

I'm not actually sure where this recipe came from. I think it was clipped from a Better Homes and Gardens magazine by Wortklauberlein. It was originally for bread crumb, spinach and feta burgers, but I had only one of those ingredients, so some modifications were made. Because I was making it up a bit as I went along, I changed all the original measurements and uhm... it's a whole different recipe now.

Veggie Burgers

~1-2 cups cooked black eyed peas
1 cup spinach (frozen or fresh)
2 eggs
2 tbl olive oil
2 tsp dill (fresh always better)
1 tsp oregano
a pinch or two of sage
Salt and pepper to taste, and any other herbs/spices

1. Mush up the black eyed peas to rough texture.
2. Mix everything else in, makes sure there's enough egg to coat the ingredients and hold them together. Hold back on the spinach or peas if it seems like a stretch.
3. Heat up a cast iron pan with some oil, use the same pan the sweet potatoes were done in, if using in the same meal.
4. Drop large spoonfuls of the mixture into the pan and let cook. Flatten a bit with the back of a spatula to make sure all the egg is cooked and turn over once they hold together. They're never going to be very solid, but they do hold together.
5. Serve with Asparagus Pesto.

I added the black eyed peas not just because I didn't have any bread crumbs handy, but because they're protein, and the meal needed some. I just moved the starch aspect over to the sweet potatoes instead. I suspect that other beans could be substituted. When in doubt, try something different.

Friday, May 14, 2010

Tuesday Night Dinner, part II

For the main course, I made asparagus pesto over some veggie burgers. The pesto, first:

This recipe came from the New York Times, very timely, just as I was considering what to do with some overly aged asparagus in the refrigerator drawer. As usual, I modified it to fit what I had around, and it was drastically different from the original. It turned out a little damp at first, but reabsorbed the liquid as it cooled and behaved very well on the burgers.

Asparagus Pesto
Some asparagus, perhaps a bunch
2-3 tbl olive oil
juice of 1/2 lemon (or to taste)
Fresh ground pepper
"21 seasoning salute"
Few pinches salt, to taste.

1. Wash and cut the asparagus into small inch long pieces. Boil a pot of water and drop the pieces in, cooking until they are bright green, no longer. Drain and rinse in cool water, then add to the container of a food processor.

2. Add the lemon juice, pepper, 21 seasoning salute, if you have it, or other spices. The 21 seasoning salute is a Trader Joe's mix that's especially tasty on popcorn, but can easily be replaced with fresh garlic and whatever else strikes your fancy. I used it purely for the garlic, as I was otherwise fresh out. Salt, too, then blend.

3. That's it! Set aside for later use, reheat it in a saucepan or microwave if you need to. Serve on pretty much anything.


One of the most important parts of using any recipe is being able to make it do what you want, with what you have. If I ran out to the store every time I was missing an ingredient, I would never have time left to spend in the kitchen. So, it's best to substitute where possible, adjust to the amounts you have in stock, and not let yourself be too rigid in following directions.

Thursday, May 13, 2010

Tuesday Night Dinner, part I

You may or may not have seen my tweet last night describing my dinner:

@ekl1773 Made strawberry whole wheat scones, cinnamon sweet potatoes, spinach and blackeyed pea burgers with asparagus pesto. Pleased with self.

The scone, burger and pesto recipes all came to me at once, opportunely. The sweet potatoes I made up on the spot to go with everything else, partially because I didn't have the "herb seasoned stuffing mix" called for in the burger recipe (and the horror of buying such a thing instead of working with a loaf... perhaps I'll post my stuffing recipe someday).

Cinnamon Sweet Potatoes

A couple small (1' diameter) sweet potatoes
Cinnamon
Cardamom
Olive Oil

1. Clean the potatoes and slice into thin slices, less than a quarter inch thick.

2. Drizzle a couple tablespoons of olive oil around the bottom of a cast iron pan and heat up.

3. Add potatoes to the pan and stir to coat, being careful not to break the slices. Spread them out and let cook. Sprinkle with a teaspoon or so of cinnamon and an 1/8 teaspoon of cardamom, just enough to put a dash on each slice. Stir and try to flip most of them over, sprinkle the other side as well. Add a little more olive as necessary.

4. Cook until soft, slightly browned on the edges, but not mushy. Serve immediately.

Wednesday, May 5, 2010

Chocolate Caramel Cups, +3 for alliteration

Yours truly recently acquired some very exciting and rare footage of the elusive Chocolate Caramel Cups in the wild. As you will see from the somewhat grotesque imagery shown here (reported exclusively on this blog!), the Chocolate Caramel Cups have a fearful habit of wreaking havoc on their fellows. Evidence suggests that an Alpha Chocolate Caramel Cup will strip an entire rival tribe of their outer coatings before eviscerating them (as seen below!). Your faithful reporter has little stomach for this, and shall not go into further detail. The photographs must speak for themselves in this case.

The first photograph, daringly captured by our field scout, is a close up of one of these Chocolate Caramel Cups. You may observe the formation of the cranial ridge and overall dimensions of the beast. The second image shows the vestige remnants of rival Caramel Cups, and the third was captured after the war party had left; a lone victim of the atrocities.

~ ~ ~


All silliness aside, the camera on my phone is of seriously low quality, but it's all I got. The recipe for these monsters is as follows.

Chocolate Caramel Cups

You will need one or two mini-muffin tins and tin-liners. The quantity of chocolate is easily variable and amendable, but the caramel can only be fractionally divided. I made a full batch (measurements below) and have leftover (woe is me).

1-2 ~10 oz bags of semi-sweet or dark chocolate chips (I used ghirardelli)
1 tablespoon unsalted butter
1 cup cream
2 cups sugar

1. Start the chocolate melting in a double broiler over simmering water. Stir occasionally.

2. Melt butter and sugar in saucepan over medium heat. Stir once or twice to incorporate.

3. When sugar has dissolved and no crystals remain, add the cream and again stir until just mixed. Over-stirring causes the sugar to crystalize. Continue to cook over medium to low heat, just hot enough that the caramel bubbles a little at the edges but does not get too carried away. Cook until caramel reaches 240 degrees F. (you will need a cooking/chocolate/candy thermometer for this. Make sure it doesn't touch the bottom of the pan when you're measuring.)

4. Meanwhile, the chocolate has melted. Put a small spoon-full in the bottom of each mini-muffin cup (lined) and use a pastry brush to brush it up the sides so that it reaches the top and covers all the paper. Place tin in freezer to solidify.

5. Remove chocolate from freezer and carefully pour, do not spoon, the caramel into each cup. Do this by transferring the caramel from the pot to a pyrex measuring cup with a spout. Add enough caramel to almost reach the rim, perhaps leaving 2-3 mm free for the top layer of chocolate. This top layer must be able to connect with the first layer of chocolate to seal in the caramel. Place the cups back in the freezer again while you melt a little more chocolate.

(if the caramel gets too hard/crystalizes, turn the heat back on and don't stir it.)

6. Remove trays from freezer again. Spoon more chocolate on top of the caramels and smooth it to the sides with the back of the spoon. Fill to the brim. Replace in the freezer.

7. Once everything has solidified a final time, peel the muffin cups off of the chocolate and pack away for later or eat. They should be just fine at room temperature, or in the fridge if it's hot out.

Feel free to try other fillings with the same method. I did peanut butter caramel "cups" previously, but was lacking the muffin tins, so they were really... sandwiches.

Wednesday, February 3, 2010

Seitan Recipe

I posted this elsewhere a while ago, but when it was difficult to find again today, I thought heck, I'll repost it here. Plus I'm making it right now, first time in the new kitchen. Eventually (soon, I hope, cause I'm hungry) it will become salad rolls.

This entire recipe is easy to change around, but here’s a starting point:
-4 cups UNBLEACHED (or whole wheat) flour (use more on your second or third try if you want, but probably not more than 6 cups)
-enough water to make your pile of flour (which didn’t need to be accurately measured at all) into a solid ball of flour dough. The ball is very important, so make sure it’s all stuck together and not too wet or dry at this stage.
-Once you’ve got a ball, fill a mixing bowl with water and begin to gently knead the ball under it, keeping it together as best you can. It does get a little too soggy sometimes and tries to come apart, but if you just keep going patiently and keep the bits together you’ll be fine. The water should be changed fairly frequently, once it becomes opaquely white. The white is the starch coming off of the gluten, which is what we want. Gluten=protein=yay.
-So you knead for about 45 min until your ball becomes a bit more solid and rubbery. The water should be a bit less opaque when you refill it now. Ideally you might want it to be clear, or quite close to that. Definitely don’t stop until it’s close or you’ll get sponge instead of seitan. I like to put a cutting board in the bottom of the sink and knead under a light flow of water for a while, sometimes picking up the ball and rubbing it or spreading it under the water to get those pesky lumps and starch out.
-Now that you have a squeaky lump of what looks like beige brains...
-Get a large frying pan with a lid, about 2” deep. Make up your simmering sauce to cook the seitan in. I think it can also be baked and other things, but I like doing this for some all-purpose seitan. Using a 2 cup measure, mix about 1/4 cup soy sauce, 1/8 cup olive oil, 3 tbl (ish, really, I just dump some on) sage, some thyme, maybe a couple drops garlic oil, salt, pepper... sautee some onions first and use those, too. Again, this is pretty arbitrary and variable, so maybe start with something simple (soysauce/oliveoil/sage) and then experiment later. Pour this into the pan and fill up with some water, about an inch deep. Bring to boil.
-Cut your lump of “brains” into half inch strips. Squeeze each of these carefully over the sink to get out the last bits of water, and lay them into the hot simmering sauce (turn down to simmer now). Put on the lid and let them sit for about 10 minutes.
-At this point the seitan lumps should have puffed up and look like poofy beige blobs. They can be coloured with this sauce, too, so more soy sauce makes darker seitan, etc. After 20 mins turn the blobs over, simmer another 20. Remove from heat and lay your blobs on a cutting board to cool. The sauce can be saved for another (slightly weaker) batch later.
-The seitan can be cut up again from here and used in stir fry, spring rolls, on salads, in tomato sauce.. whatever you like. I think it lasts about a week, but it’s usually gone so fast I haven’t tested that.

Saturday, January 9, 2010

Miso soup, of a sort

As usual, the fridge was empty, the cabinets were bare, and it was dinnertime. We tend to have some basics lurking in corners, a few carrots, some ginger, noodles... And what better to do with odds and ends than soup? With Tampopo in mind, I set about to make something tasty, simple and filling.

It began, as most soups do, with a pot of water. I used my dutch oven for the heck of it, about half full of water (6 cups). Into this I chopped one onion, about an inch of ginger (would have used more if I had it, ~2") and four cloves of garlic. After letting it boil for at least half an hour, I strained out the bits, and put the broth back on the stove with the heat off.

Meanwhile, in a blender I had been working on the miso. First I squeezed a lemon, retaining the skins, and put the juice along with a large (1/2 cup+) spoonful of red miso paste into the blender. I used the lemon skins to grate some zest and set it aside. I also chopped some dried kelp and set this aside, as well. Then I added the strained out onions, garlic and ginger bits to the blender as well as a splash of vermouth (because it made more sense than soy sauce (overwhelming) or water (thinning), and because I didn't have sake, which would have been more appropriate). [Blend] You could also use some of the broth, but make sure you have enough left in the pot for cooking the veggies in the next step. The broth is not strong on its own, but there should be about 6 cups left by the end step. I added water twice during the cooking process.

While everything was blending and cooking I also prepped some rice noodles (vermicelli style) and chopped a cube of tofu. Note that as a component in this soup the tofu pretty much tastes like plain tofu. I like it this way, and it's traditional in miso soup. The noodles soaked in a bowl of warm water for ~10 minutes. They don't need to be completely soft, as they will finish cooking when added to the soup.

At some point I managed to get two chopped carrots and about a 1/4 head of cabbage into the broth on the stove and turned it back on for a few minutes, maybe 5. The cabbage got a little overdone in my case, and could be replaced with a different green soup veggie, possibly bok choy or some such.

Check list:
-Soup base: broth + carrots + cabbage
-tofu squares
-rice noodles
-blended miso mixture
-chopped kelp
-lemon zest

To assemble: I used a couple of conical bowls, which meant that things stayed in the order I added them in instead of spreading out across the bottom of a wider bowl. First about a cup of tofu cubes went in (mine were largish), then a handful of noodles, then several ladles of soup to fill to the top with hot broth (ideally there should be a good pile of veg, but not so much that they emerge more than 0.5 cm from the broth . On top of this I spooned a generous helping of the miso mixture (er, 1/4 - 1/2 cup?), then a sprinkling of kelp and lemon zest and voila! a rather pretty bowl of soup.

Of course, the whole shebang should be at least partially stirred up before eating, or you'll get all your miso in one bite. It should be mixed into the soup on the table to create a new broth. Miso cannot be cooked or it will die a horrible horrible death.

~ ~ ~

In retrospect, and if I had my choice of ingredients, I wouldn't change much. I might ditch the onion in the beginning for some shredded spring onion on top, and find something more pleasant than cabbage. There was also a vote for soba noodles instead of the rice noodles I used. The lemon really makes this dish, so don't you dare go using bottle lemon juice. Tsk.