Showing posts with label dessert. Show all posts

Friday, May 17, 2013

The Art of French Baking: Strawberry Frangipane

he Art of French Baking, published by Phaidon, is a beautiful book. The covers are padded and sparkling white, the pages thick and smooth, the photographs well shot and printed, and any cookbook with bookmark ribbons gets a lot of points from me. However, the recipes seem to leave a little something to be desired.

I am an experienced baker. Not an expert, not experimental, and not a chemist, but my pie crusts are tender and flaky, my bread rises and my batters are light and fluffy. Therefore I was somewhat surprised when several recipes from this book did not come together or bake in the way I expected. The instructions are quite brief, which is fine if one already has some technique, but I repeatedly found myself with a dough that didn't hold together despite extra liquid, or choux puffs that simply wouldn't rise (I tried twice in one day), or worse, cookies that burned but didn't bake through.
strawberries, pie, cake, baking, frangipane

So now I've determined that I'll just need to reinterpret and double check the recipe for logic before I start anything. Make sure the oven temperature doesn't seem oddly high, that the wet and dry proportions make sense and that I can adjust here and there. Or at least I can make the recipes with frosting and cover up all the little problems!

Today I needed to use up the last of a flat of strawberries from market, and the Strawberry Frangipane looked pretty easy. It's just egg yolks, sugar, ground almonds and strawberries. Nothing can go wrong! Well, nothing except my being short an egg. Sigh. So I just eased back on the other ingredients. The batter was thicker than I was expected and didn't exactly pour between the strawberries, but it did melt around them once in the oven. Then it was just a matter of keeping an eye on it until the top was the perfect shade of done... except when I cut into it, the inside was not at all done. Not even a little. Back into the oven it goes.

I'm fairly fed up at this point, having never had so much trouble with recipes before. Perhaps it's partially my fault, but with every recipe coming from the same book it seems unlikely that this is entirely on me. I really want to love The Art of French Baking, but it's not living up to my expectations. You all know what the lesson is here, right?

strawberry, frangipane, pie, cake, eggs, simple
Here's a quick list of the things I've made from this book:
  • Sweet orange croquettes- excellent
  • Babas au rhum- pretty good, not as fluffy as I'd like.
  • Pate a choux puffs with pastry creme- total fail, no puff to be had, more like cookies. I have done these successfully in the past with a Martha Stewart recipe!
  • Petit fours with chocolate ganache and sprinkles- worked well in mini muffin tins
  • Duchesse petits fours- Dough didn't even slightly hold together and overcooked too quickly
  • Orange gateau, I think- I have a vague memory of using a pineapple, too. dunno.
  • Sweet slices- basically sugar cookies, oven temp was also too high
  • Strawberry Frangipane- Ha. Maybe once it's baked for three times the suggested time!

Saturday, July 14, 2012

Technical Testing Tribulations

ay back in November I finally staked my claim on a corner of the internet by registering and hosting a website under my name. I had stalled for almost a full year, thinking there was too much I would want to research before pinning down a registrar/host. Turns out that was the easy part (once I realised I didn't need a slew of dedicated servers in the former Soviet Bloc).

After choosing DreamHost at the recommendation of a friend and a popular website (Lifehacker, who recently re-affirmed DreamHost's dominance), all I had to do was learn how to code an entire website. And not just any website, one that would display a photographic portfolio dynamically and interactively and [buzzword] and [so on]. Ok, so I haven't quite gotten to that part yet, but the site exists and is a decent placeholder.

pie, blueberries, tart, lemon curd
The holdup is that I'm the sort of person who can't just throw up something pre-fabricated and call it a day, I have to learn how to code the entire thing myself, learn databases and cascading stylesheets, from scratch. Maybe once I've done that I could take an easier route, but without understanding the background it seems too much like cheating. Besides, most of the point was giving myself opportunity to learn, given that my photos probably aren't going to start flying off the shelves (there are some up, but they, too, are placeholders).
poached, apricots, tart, pie, cheescake
So in the meantime I've just been using the web export feature in Adobe Lightroom (a god-send for those of us who like cataloging, integration with other applications and services and powerful but simple tools). The problem I'm leading up to is that I'd like to stop hosting the photos I use in blog posts on Picasa and move them all over to a dedicated storage folder on my website. Heck, someday I should move this blog there, too.
orange, chiffon, chocolate, meringue, pie
The problem is that to use a photo in a post, I need to have a link to the .jpg file that will never change, or at least use a relative link to just "/kitten.jpg" rather than "http:// blah/folderA/section56/kitten.jpg" and so on. So that's one solution. But I also need the photo to link to a gallery view on my website, so that the clicker can browse through other photos from my blog, and also use spiffy navigation controls to browse by keyword or just mosey back through other parts of my portfolio.

I'm not going to list how much of that I have no idea how to accomplish, because it's too overwhelming. But, I've written an entire blogpost about it now, so that will hopefully motivate me.

Oh, and the reason there are random photos of pie here is because they're hosted on my website, just... not very sophisticatedly.

Tuesday, March 20, 2012

Photos of phood: Nougatine Pastry Crisps

ood lord.
I haven't posted since the holidays! The horror! Much didn't happen, then much did happen, and now I've got several drafted posts to get out and need to decide which go first. So instead, here's a couple photos of the most recent baking incident.

Earlier this month I had a request for palmiers as a birthday gift, so I [somewhat foolishly] bought a log of Amish butter from the local butcher. Foolish because 1) I neglected to notice that this was *salted* butter, something I never use and 2) it will always smell like butcher shop to me. Also probably 3) 2lbs of butter was more than I needed and more expensive than the perfectly good Cabot at home, but heck. Anyway, I had half left over and the fastest way to get rid of butter is in a 1lb butter package in pastry, SO:

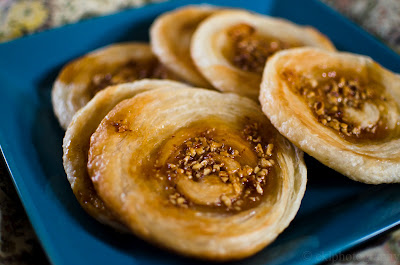
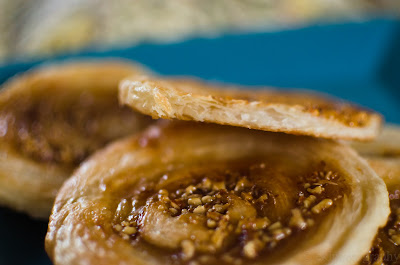
pastry, nougatine, almond, caramelMade puff pastry dough. ... only then did I go through a few recipes and realise that everything called for ingredients I didn't have (and I try to bake only with things on-hand, otherwise it would become a huge expense very quickly), fruit and cream and whatnot. Palmiers really only use butter, flour and sugar, which makes them very convenient. Eventually I found a recipe for an assembled dessert from the Ritz involving sort of a pastry sandwich around a cream/fruit filling from the Pie and Pastry Bible (I know, I know, big surprise, I'm using the book again).

pastry, nougatine, almond, caramel The pastry discs are simply slabs of the dough rolled out thin and baked between cookie sheets to keep them flat. However, the secret (or not) addition is the nougatine crumble which tops them. I doubled the original recipe for this (figuring it can go on yogurt and stuff, too) and got a nice sheet of almond filled crunchy caramel. With a crumbled spoonful of this sprinkled on top, the pastry rounds become cookies with slightly chewy caramel and nutty almonds on top. Easy enough, attractive, and so flakey you can barely pick one up.

Monday, October 17, 2011

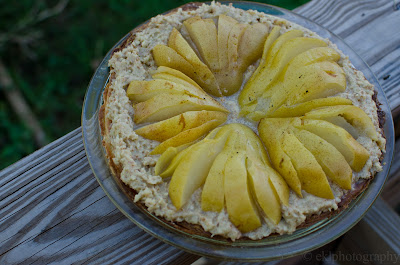
Pear, almond cream, tart. At length.

ometimes the route I take to a baking project is long and roundabout. In this case, I started well over a month ago thinking "oh hey, I should make pie crust with all this cream cheese that came out of my parents' fridge during the hurricane." Having subsequently moved, still with said cream cheese, it's now October, and the fruit available has changed completely. Fortunately, I moved to a location two blocks from a weekly, year-round farm market and despite the apple season fanatics, I found some lovely pears and bought 10.

Then I went looking for a recipe. I'd do it first, but that tends to result in a harried and expensive trip to several specialty stores looking for things like "espresso powder" and whatever. In this case, I got away with nothing more extravagant than a vanilla bean (albeit a bit of a ripoff at the local "My Organic Market").

Pear and almond cream tart pre-baking

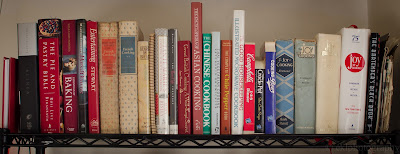
So there I was with pears and cream cheese pie crust premade and waiting in the freezer (keeps for up to three months, yet I never pre-make enough for it to last more than one pie). A quick poke through my trusty bookshelf o' cookbooks, and I arrived at the inevitable conclusion: The Pie and Pastry Bible. Someday, I swear I'll use different books. Really. Having avoided apples especially because I'm tired of fruit-in-crust pies, I wanted something a little more interesting. The options were a gingery pear chiffon pie (which I had modified a couple years ago into a ginger and chocolate ganache pie for Thanksgiving) or pear almond cream tart.

Cookbook collection on the pantry shelf
Before I get into the things I'll do differently next time, let me just say that this is a very tasty, decent looking little open-faced pie/tart. However.

It started with the pre-baked crust. Ok, so the recipe called for the normal flakey pie crust, in a tart pan, and I was using cream cheese crust in a pie plate. It kinda shrunk a lot and got a bit too toasty on its own when it should have been a little underbaked in order to withstand the subsequent baking with filling. Still, super flakey, and actually incredibly tasty when dark brown and slightly caramelized with filling.

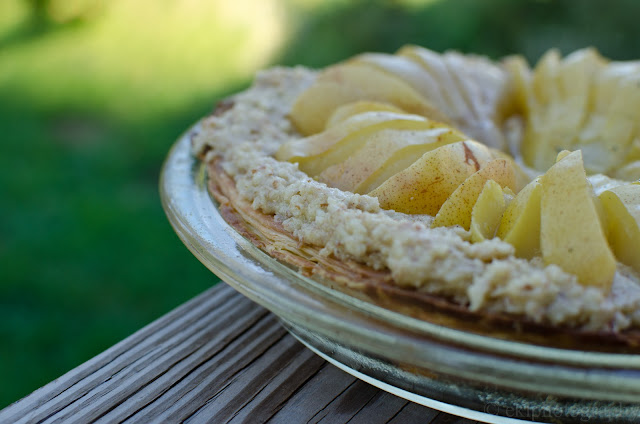
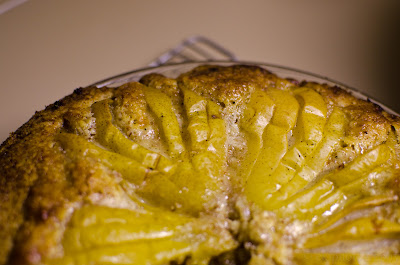
Pear almond cream pie, fanning of pears, cut
I also neglected to thoroughly process the almond flour/stuff. And to use blanched, sliced almonds. But that's just cause they come in "raw" in the bulk department. So, instead of what I assume was meant to be a smooth, creamy filling, I have a nutty, thick filling. It did manage to puff up (eventually) and has the texture of chewy meringue around the edges (also a little darker than necessary).

The poaching of the pears went well, though I recommend watching them a bit more carefully than I did and not getting distracted by other wildly exciting things like de-clogging the vacuum. yeah. I reserved some of the poaching liquid for my food and drink obsessed housemate to mix cocktails or something with. The vanilla bean was very worth it and can never, ever be substituted with vanilla extract, so don't even think about it.

Finished pear almond tart, meringue edges
In the video on Rose Levy Beranbaum's website (below), she has the pears sliced the short way across and fanned into little ridged mountains in the almond filling. It makes a kind of star pattern, but that didn't quite make sense to me visually, edibly or uh, logistically, so I fanned them lengthwise instead, with the intent that the almond filling could puff up between the slices. This mostly worked, but again I neglected to really thoroughly drain the pears, so the pie/tart took a lot longer to cook and was too wet in the center for most of the time.


This is kind of a long post for one little pie experiment, but I went searching the interweb for more info when the recipe didn't make sense and only easily found RLB's website. Hopefully this will help someone else. And also photos. It's blissful having a back porch to take things out on into natural light in order to photograph. The finished pie photo is from inside and at night (bleh!).

Tuesday, July 19, 2011

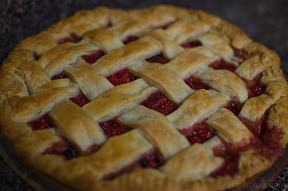
Wineberry pie

aving the recipe is only half the battle. It took several pies for me to get the pie crust to behave in such a way that I could roll it out, instead of trying to piece something together out of the fragments that never became a whole. Your only hope in this matter is to start with a good recipe and figure it out for yourself. The very best book ever is "The Pie and Pastry Bible" by Rose Levy Beranbaum. I've gotten so many recipes out of this book, if you know me, you've probably had one. In my mind, the best kind of cookbook isn't just recipes but philosophy and information, so that you actually have some clue why things need to be just so. Absolutely essential for the baker. Go get it. shoo.

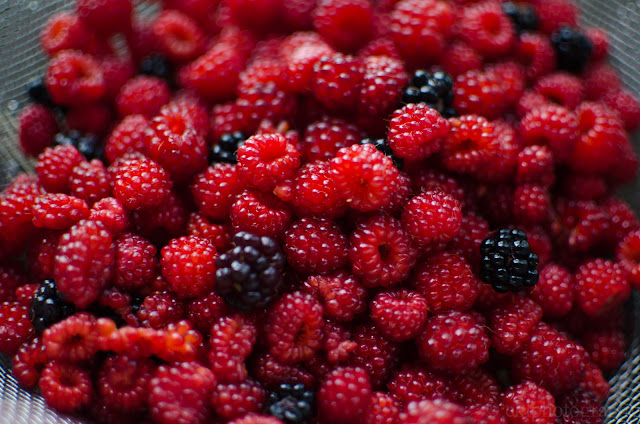
This past weekend I had the good fortune to spend a night atop a mountain in the Shenandoah region, and came back (thanks to Wortklauberlein) with a pound of fresh berries from the bazillions of vines lining the roads. The local population informed us that they are wineberries, a particularly sweet variety of raspberry. There's nothing so satisfying as baking or cooking with food you've picked yourself. er, or that someone has thoughtfully picked for you.
pie, berries, fresh, handpicked, appalachians, shenandoah, wineberries, blackberries

Ingredients
"Deluxe flaky pie crust" 21 oz
    14 tbl unsalted butter, cold.
    2.25 cups flour (pref. pastry)
    1/4 tsp salt
    1/4 tsp baking powder
    7.5 tbl ice water
    1 tbl cider vinegar
0.5 cup sugar (I only had brown)
2.5 tbl cornstarch
pinch salt
1 lb berries, washed and picked over for passengers.

  1. Pick a pound of wineberries and a few blackberries from Flattop Mountain. Or your backyard. Or somebody else's backyard. I don't think you can buy wineberries in the store, but this recipe will likely work with whatever berries you have handy.
  2. Make pie crust:
    • cut butter into small cubes, freeze for 30 min +
    • put flour, salt, baking powder in gallon size ziplock bag, shake to mix thoroughly.
    • add frozen butter, expel air and use rolling pin to (patiently) roll butter into flat flakes. Shake bag to redistribute when mix gets bunched up at one end. Freeze for 10 min.
    • sprinkle water and vinegar into bag, toss to mix.
    • keeping the bag open, knead from the outside of the bag until dough forms a single lump. To do this, you'll need to use the bag to fold the dough onto itself (don't touch it directly). About halfway through you'll get frustrated because it's not holding together yet. Put it in the fridge for a few minutes and come back to it. Once it's a lump, divide into two pieces, one for the top and one for the bottom crust. 
    • Refrigerate for at least an hour, preferably overnight. 
  3. Roll out bottom crust on lightly floured surface to 1/8 inch thickness. Lay in pie pan, cover and refrigerate at least 30 min, no more than 3 hours.
  4. Combine sugar, cornstarch and salt, whisk together. Toss berries gently in this mixture and let sit for 15 minutes. 
  5. Toss gently again and pour into bottom crust.
  6. Roll out top crust to 1/8 inch. I used a lattice pattern, but you could do a full top crust and cut a hole in the middle for steam to escape. Lay top crust over berries, use water to glue and fold edges under (or over) and crimp using a fork or your fingers.
  7. Refrigerate pie, covered loosely in plastic wrap, for about an hour.
  8. Preheat oven to 425 at least 20 minutes before baking. Use a baking stone if you have one and put it on the lower rack. Bake pie for 30 minutes or until juices are bubbling and crust is browned. Put a baking sheet or foil underneath the pie plate to catch drips.
  9. Let cool for at least 2 hours before serving, probably more like 4 if you have the patience.

Friday, December 24, 2010

Obligatory, but festive!


As it turns out, borrowing someone's computer can be very frustrating when it's significantly different from your own. Apologies for poor formatting etc in this post, but wanted to get it up in time to say Merry Christmas!... in a somewhat timely fashion.

Eenywho, just some photos of the cookie-making marathon last weekend. I'm fairly pleased with the results: iced sugar cookes, braunekuchen (molasses/spice cookies), truffles, banana-chocolate-chip-mini-muffins (of hyphenage +1) and raspberry oatmeal ribbon bars.

Friday, July 23, 2010

Photos of Phood: Caramel Corn


So darn easy, and so tasty.

Wednesday, July 21, 2010

Photos of Phood: Enrobed in Chocolate


Ah, here is one of the ganache balls finished! In the foreground are my attempts to do the same thing with caramel. Semi-success, mostly turned into puddles. Next time they'll be in cup form instead.

Monday, July 19, 2010

Photos of Phood: Chocolate Ganache

I think I need lights so I can shoot my food stuffs properly. The lack of focus and the flash bother me. Nonetheless: Chocolate. I believe this became centers for little chocolate covered ganache balls.

Sunday, July 18, 2010

Tuesday Night Dinner, part IV

Somewhat delayed! Possibly by a month! whoops.

So after the pesto and whatnot I made scones as an afterthought. The recipe came from the Washington Post food section, but of course I didn't quite have everything required. I substituted whole wheat flour for the barley flour and used some chopped up and slightly macerated strawberries as the center layer. They make a fantastic not-too-sweet dessert or a snack with tea and are in fact ridiculously easy to make. Unfortunately I didn't take any pictures, but rest assured that they're very tasty and attractive scones.

Ingredients:

For the scones
  • 8 tablespoons (1 stick) cold unsalted butter, cut into 1/2-inch pieces, plus more for greasing the baking sheet
  • 1 cup plus 2 tablespoons barley flour, plus more for the work surface
  • 1 cup all-purpose flour
  • 1/4 cup packed light brown sugar
  • 2 teaspoons baking powder
  • 1/2 teaspoon baking soda
  • 1 1/4 teaspoons kosher salt
  • 1/2 cup regular or low-fat buttermilk
  • 1 large egg
For assembly
  • 1/2 cup strawberry jam or marmalade
  • 1 tablespoon unsalted butter, melted
  • 1 tablespoon granulated sugar

Find the rest of the recipe here.

Thursday, July 1, 2010

Sing It Low and Smooth

A random title, a need to post something to get the blog rolling, and a complete lack of oomph in working on any of my 9 drafted posts brings to you the following:

I have successfully created the world's best smoothie... and I don't know exactly what I put in it. I suspect the ingredients went something like this:

Blender.
Dark, dark cherries, pitted by hand, leaving cherry-blood stains on the counter. (3/4 cup)
Apricots, recently pitted, sliced, frozen because no one ate them in time. (3/4 cup)
Two fragments of melon ice, hunks of cantelope that turned glacée after a thawing and refreezing. (~2 slices)
Orange juice concentrate, spoonful of, another frozen fragment.
The last of the yogurt, perhaps (1/2 cup) the thickest trimmings of cream.
Milk, to fill the blender to the blade; to ensure a smooth result.
Finally, a dash of orange liqueur, a half shot of dark rum, to round the taste and emphasize the tang of the apricots.
Blend.


I didn't sing for a long time, the last few years. Now I'm bringing back fragments (word of the day) of songs half forgotten and wishing I hadn't taken singing for granted when I had a chance to perform. If I wasn't so self-conscious I would like to sing classic jazz tunes again, like Bye Bye Black Bird and That Old Black Magic. I wonder if people don't take music for granted these days, since everyone has an personal music player of some sort.

The reason these things are connected is because I'm vaguely synesthetic. Which is not, apparently, a word. It's to do with seeing colours for tastes, feeling music for colours, and a sort of triangle created between the three. So, this tangy and sweet smoothie, quite pink from the cherries, feels like orange and aquamarine on my tongue, and sounds like xylophone (perhaps Street Song, Key people?) in my head. Bright and sharp with a bubbly underside.

Anyone still with me on this?

Saturday, May 22, 2010

Photos of phood

This morning started out with slightly frenetic whipping of eggs, cream and mascarpone, followed by some folding and chilling, all of which led to this evening, when I laid out the strawberries and added lemon glaze... I'm pretty pleased with the results, but I'm very nervous that the nut crust will do its usual thing and refuse to dislodge itself from the confines of the pie plate. ah well. It will still be very, very tasty. Unfortunately I wont know until we get to the brunch party tomorrow. Impatience.

And wouldn't it be nice if I could include a digital taste in posts about food? Like scratch and sniff.

And then dinner tonight (after a batch of banana bread to take over to friends) is about to be fresh pasta with spinach, tofu, and green garlic pesto. Fresh pasta is wonderful, but it's very difficult to roll out by hand. The dough is quite stiff, and pressing down firmly enough with a rolling pin to get the sheet thin enough to make reasonable sized pasta is enough to make my carpal tunnel twinge.
And while I was out earlier I bought (extravagantly) a very clean, plastic covered jacketed copy of James Beard's bread book from Capitol Hill Books (staffed by an appropriately grumpy old guy and piled to the ceiling, literally, with books. Including the bathroom.). I'm pretty excited about it.

Wednesday, May 12, 2010

Caramel corn

I'm going to post a few recipes over the next couple of days, because I have a small backlog piling up here. And why post them all at once when I can spread them over several posts and not overload you all at once? Cooking and baking are things I do to procrastinate, even to avoid writing blog entries, say, so I figure, heck, I'll turn that sucker right back on itself and show it who's boss. Uhm, by which I mean, me?

First up, we have Caramel Corn. I made this for work a few weeks back and it was quite a success. The recipe could easily be halved if you don't have a ginormous bowl around. I found it in the Joy of Cooking, 75th anniversary edition. I've only got three copies of the Joy so far, and I'd like at least four, maybe six... My other two are both from circa 1950, one from a used book store and one that was my Grandmother's (I'm very happy to have the latter, as well as her recipe box!). You see where my interest in cooking and booking overlap here: collecting cookbooks is a fantastic hobby. A bunch of mine are in my LibraryThing collection.

Caramel Corn

3/4 cups unpopped popcorn
corn/canola oil
1.5 tbl unsalted butter
1.5 cups light brown sugar
6 tbl H2O

1. To pop the popcorn, put a few (three) kernels in the bottom of a large pot (needs to hold 6 cups of popped popcorn) and just cover them with a layer of the oil, making sure it's distributed evenly across the bottom of the pot. Turn heat to high and wait for the oil to heat up. When all three kernels have popped (watch out for spraying hot oil), pour in the rest of the popcorn and put a lid on it. While waiting for it to pop, hold both pot handles and shake the kernels to make sure all of them are exposed to the heat and none of them stay in one place long enough to burn. It is possible to do this just above the burner so the oil keeps getting hotter. This process took me a few tries to learn, so you might want to try a smaller batch, first. The balance of heat and oil is delicate; too much direct heat and it burns, too much oil and it's greasy. You can also caramelize "airpop" popcorn, but I haven't tried it. Remove from heat when popping slows.

2. Lightly salt the top of the popcorn in the pot, then pour into large bowl and salt again, toss to coat.

3. To make the caramel, melt the butter in a saucepan, then add the sugar and water. Heat should be mediumish, whatever it takes to create just some loose bubbles around the edges of the sugar. Put a lid on for a few minutes to let the steam wash any sugar crystals off the sides of the pan. Cook to 234F, the "soft ball stage."

4. Carefully and slowly, pour the caramel over the popcorn, stirring as you go. Try not to get it on the sides of bowl, but cover as much popcorn surface area as you can initially, as it cools fast. Keep stirring until the caramel stops moving to new kernels.

5. Spread the popcorn out on cookie sheets to cool. Once it's at a comfortable temperature to handle, break the bunches of popcorn apart with your fingers, down to bits an inch big or smaller.

6. When completely cool, pack it up in bags, containers, or put it back in the bowl and share with party guests. I consider this recipe seriously easy and seriously tasty. Would make good party munchies along with my spicy caramel almonds recipe (which I'll have to find again...).

Wednesday, May 5, 2010

Chocolate Caramel Cups, +3 for alliteration

Yours truly recently acquired some very exciting and rare footage of the elusive Chocolate Caramel Cups in the wild. As you will see from the somewhat grotesque imagery shown here (reported exclusively on this blog!), the Chocolate Caramel Cups have a fearful habit of wreaking havoc on their fellows. Evidence suggests that an Alpha Chocolate Caramel Cup will strip an entire rival tribe of their outer coatings before eviscerating them (as seen below!). Your faithful reporter has little stomach for this, and shall not go into further detail. The photographs must speak for themselves in this case.

The first photograph, daringly captured by our field scout, is a close up of one of these Chocolate Caramel Cups. You may observe the formation of the cranial ridge and overall dimensions of the beast. The second image shows the vestige remnants of rival Caramel Cups, and the third was captured after the war party had left; a lone victim of the atrocities.

~ ~ ~


All silliness aside, the camera on my phone is of seriously low quality, but it's all I got. The recipe for these monsters is as follows.

Chocolate Caramel Cups

You will need one or two mini-muffin tins and tin-liners. The quantity of chocolate is easily variable and amendable, but the caramel can only be fractionally divided. I made a full batch (measurements below) and have leftover (woe is me).

1-2 ~10 oz bags of semi-sweet or dark chocolate chips (I used ghirardelli)
1 tablespoon unsalted butter
1 cup cream
2 cups sugar

1. Start the chocolate melting in a double broiler over simmering water. Stir occasionally.

2. Melt butter and sugar in saucepan over medium heat. Stir once or twice to incorporate.

3. When sugar has dissolved and no crystals remain, add the cream and again stir until just mixed. Over-stirring causes the sugar to crystalize. Continue to cook over medium to low heat, just hot enough that the caramel bubbles a little at the edges but does not get too carried away. Cook until caramel reaches 240 degrees F. (you will need a cooking/chocolate/candy thermometer for this. Make sure it doesn't touch the bottom of the pan when you're measuring.)

4. Meanwhile, the chocolate has melted. Put a small spoon-full in the bottom of each mini-muffin cup (lined) and use a pastry brush to brush it up the sides so that it reaches the top and covers all the paper. Place tin in freezer to solidify.

5. Remove chocolate from freezer and carefully pour, do not spoon, the caramel into each cup. Do this by transferring the caramel from the pot to a pyrex measuring cup with a spout. Add enough caramel to almost reach the rim, perhaps leaving 2-3 mm free for the top layer of chocolate. This top layer must be able to connect with the first layer of chocolate to seal in the caramel. Place the cups back in the freezer again while you melt a little more chocolate.

(if the caramel gets too hard/crystalizes, turn the heat back on and don't stir it.)

6. Remove trays from freezer again. Spoon more chocolate on top of the caramels and smooth it to the sides with the back of the spoon. Fill to the brim. Replace in the freezer.

7. Once everything has solidified a final time, peel the muffin cups off of the chocolate and pack away for later or eat. They should be just fine at room temperature, or in the fridge if it's hot out.

Feel free to try other fillings with the same method. I did peanut butter caramel "cups" previously, but was lacking the muffin tins, so they were really... sandwiches.